OFFICIAL MANUAL / FIRST CONNECTION
Shadowrocket Setup Guide
Import an existing subscription → Global Routing → Connection authorization → Verify access → Troubleshoot
This guide covers initial setup on iPhone and iPad. First establish a manual connection, then consider adjusting rules and On Demand. If you have already completed part of the setup, skip to the relevant step.
STEP 01 / ADD SERVER
Add a server or import a subscription
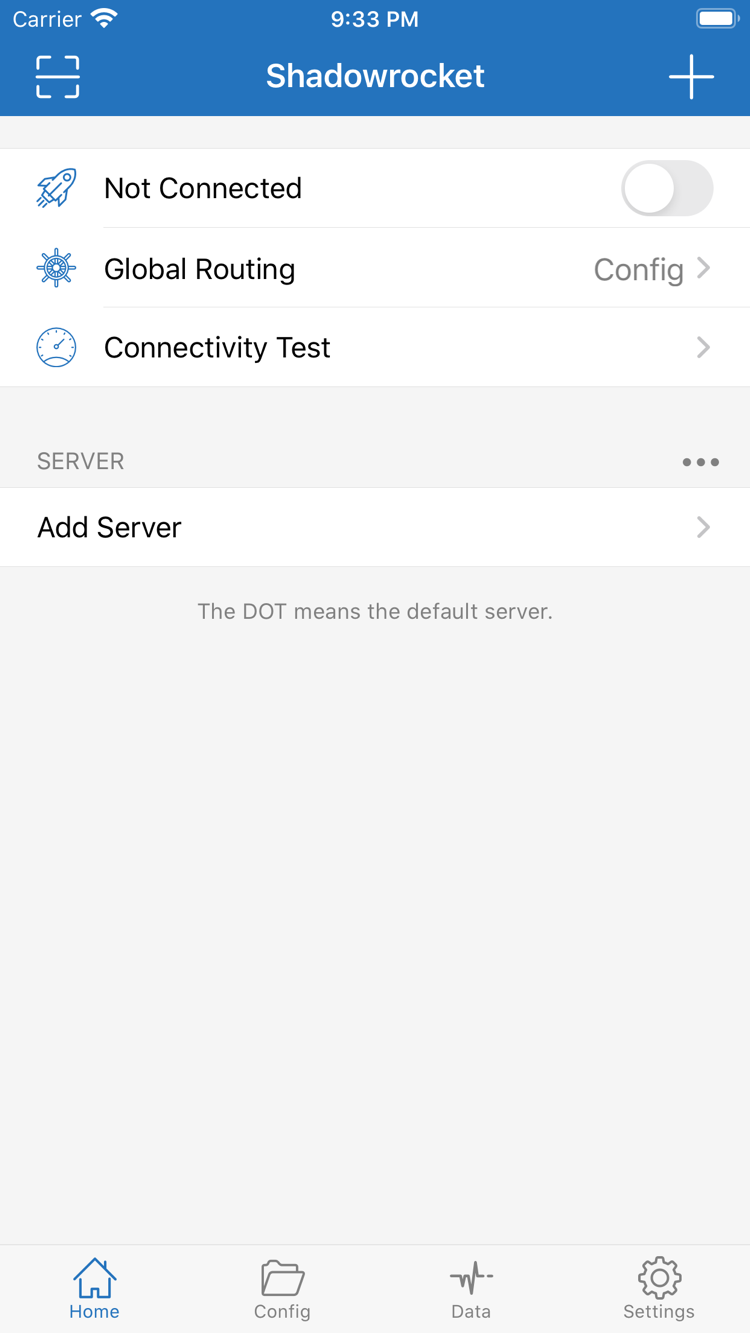
Open Shadowrocket and go to Home. Under SERVER, find Add Server. First identify the type of details you have: a link provided by your service provider to update a server list should be added as a subscription; protocol, server address, port, and authentication details listed separately should be added as an individual server. These use different fields, so don’t paste a subscription link into Host.
Have a subscription link? Choose Subscribe
Tap Add Server, open the Type menu, and choose Subscribe. Paste your complete subscription link into URL. Add a recognizable label, then save. Don’t include spaces, line breaks, or explanatory text from a message before or after the link. Query parameters are usually part of the URL, so don’t remove them to shorten it. Subscription links may contain access credentials; treat them as private and don’t share them publicly.
Return to Home after saving and wait for the subscription to load. Check that the expected group and server entries appear. If you see the subscription name but no selectable servers, check the subscription update result first. Turning on the connection won’t fix an import problem. Confirm that the URL is complete, the subscription is still valid, and your current network can reach it. If your provider has issued a new link, update the record with the complete new URL.
Have server details? Enter them according to Type
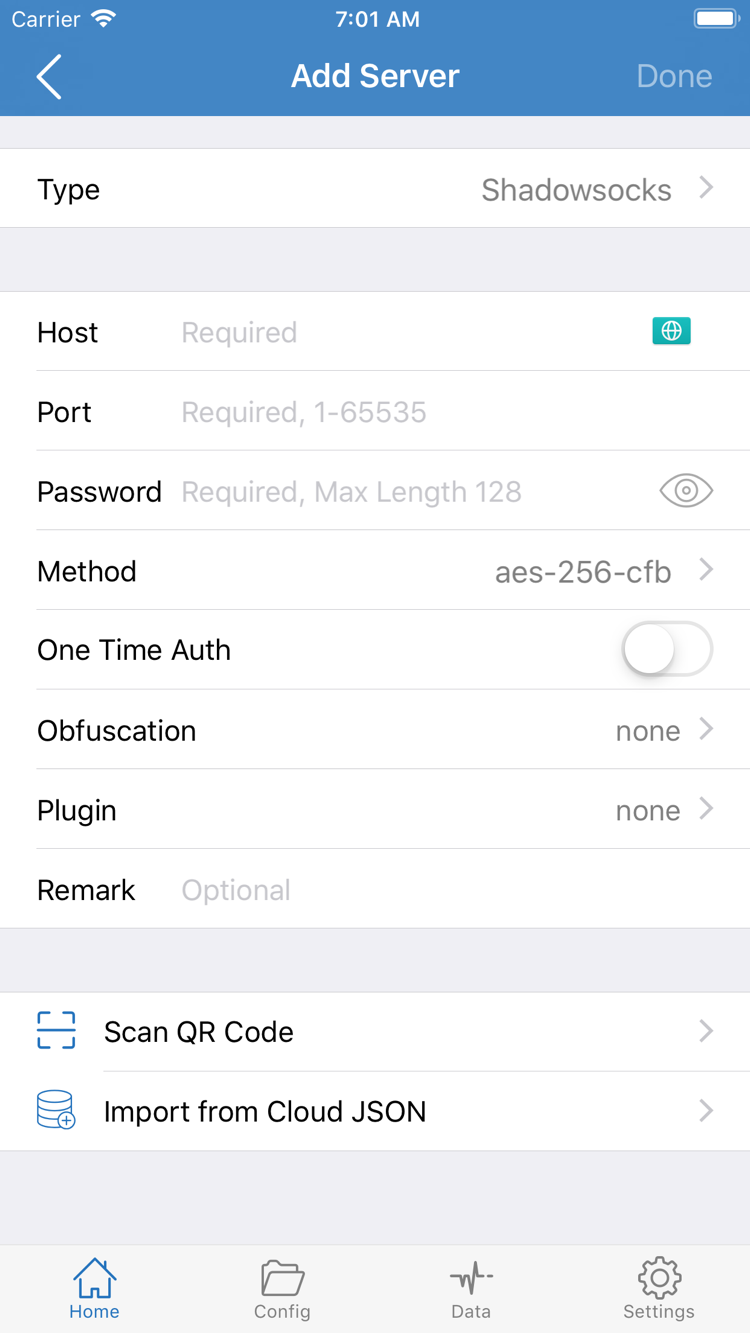
To add a server manually, choose the Type that matches the protocol in your details, then enter the Host, Port, and required authentication and transport settings. The screenshot shows one type of server form, with fields such as Password and Method. Fields change when you select a different Type, so the screenshot is not a universal list of required fields.
Host is generally the server’s domain name or address; enter the corresponding port in Port. Don’t put a full URL with a path in an address field. Password and Method must match your server details—don’t guess based on their names. For VLESS, Trojan, WireGuard, and other types, check the parameters against the information you were given. Change certificate validation, server name, or transport path only when your details call for it; turning off validation at random won’t fix incorrect settings.
If you have a scannable QR code, use Scan QR Code in Add Server and grant camera access when prompted. Import from Cloud JSON is for compatible configuration files, not a general-purpose way to add any subscription link. After importing, check the Type and address in the entry details. If you’re unsure about protocols and subscriptions, read the quick reference before choosing a routing mode.
STEP 02 / GLOBAL ROUTING
Choose a routing mode and check Config
Once your server entry appears, don’t connect just yet. On Home, tap Global Routing and choose Config, Proxy, or Direct for the task at hand. This setting determines how requests are handled; it doesn’t import subscriptions or fix incorrect server details. After choosing a mode, return to Home and confirm that Global Routing shows the selection. Don’t assume the mode changed without checking.
Config: route requests according to the active file’s rules
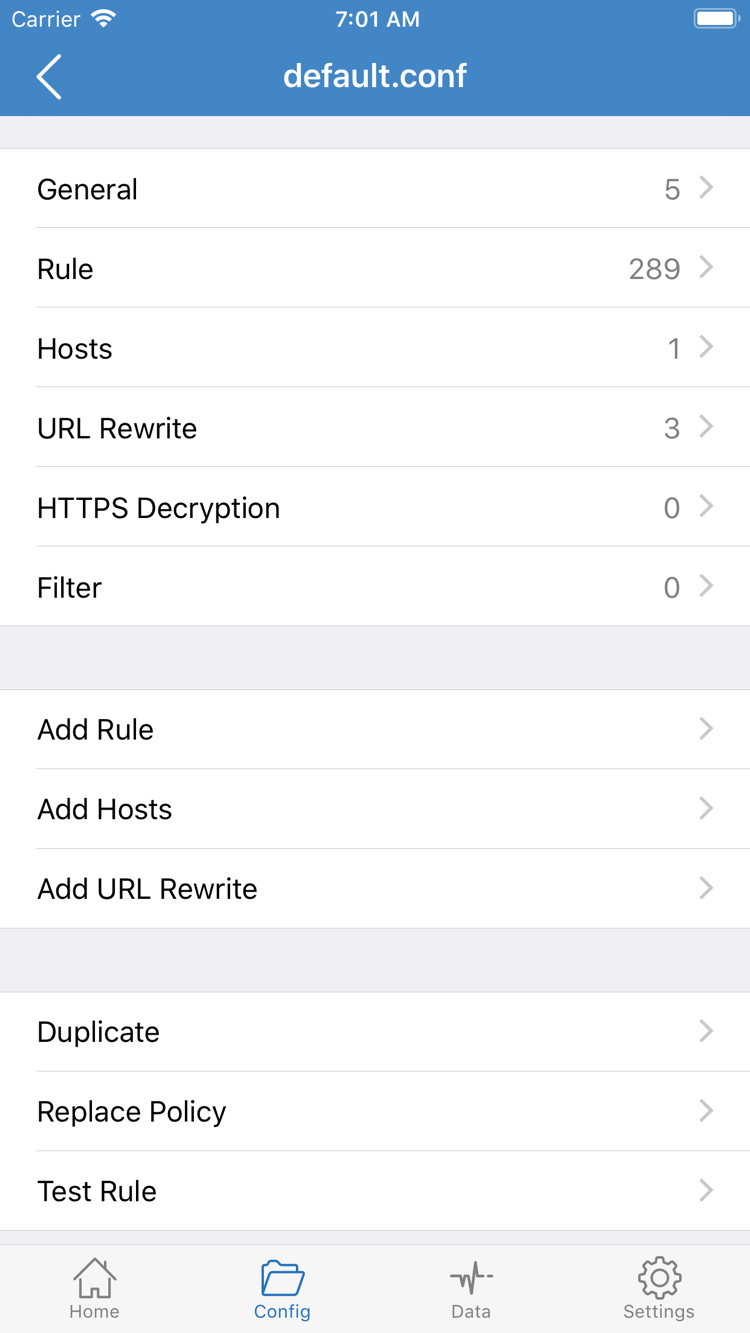
Config uses the active configuration file’s rules to determine how requests are routed. Open Config, check which file is active, then review its contents. The official screenshot shows sections such as General, Rule, Hosts, URL Rewrite, and HTTPS Decryption, along with the Add Rule option. You don’t need to change everything on your first use. Check whether Rule contains the rules you expect and how unmatched requests are handled at the end.
Rules are evaluated from top to bottom; typically, the first matching rule determines the policy. The snippet below illustrates the format and isn’t a complete replacement for your existing configuration. example.com is a domain used for illustration. FINAL at the end means DIRECT is used if none of the earlier rules match. Choosing Config therefore does not mean every request will go through the selected server.
[Rule]
DOMAIN-SUFFIX,example.com,PROXY
IP-CIDR,192.168.0.0/16,DIRECT
FINAL,DIRECT
Proxy and Direct: explicitly choose how requests are handled
Proxy sends requests normally governed by the selected routing mode to the current proxy selection. This can help you determine whether an issue is related to the rules in Config. It doesn’t mean every type of system traffic is necessarily routed the same way; verify with actual requests. Direct handles requests without the proxy and can serve as a comparison on the same network, but it doesn’t prove the server is working.
For an initial check, you can temporarily select Proxy to test the connection, then switch back to your planned Config mode. Keep a copy of the original file before changing it, and make one change at a time. Don’t replace the subscription, edit rules, and change the test method all at once, or it will be hard to tell what caused a failure. For rule keywords and the meaning of PROXY, DIRECT, and REJECT, see the quick reference. For more on settings, see Settings.
STEP 03 / HOME
Select a server and turn on the connection
After importing and choosing a routing mode, return to Home. Under SERVER, tap the server you want to use and check that it’s selected. A subscription group name and an individual server entry are separate levels; expanding a group doesn’t select one of its servers. If the list is empty, go back to the add-server step instead of repeatedly toggling the connection.
Next, turn on the connection switch at the top of Home. When disconnected, the status may show Not Connected. After switching it on, wait for the app and system to complete the connection process. The first time, you may see a system prompt to add a VPN configuration. This grants the app permission to create the relevant network configuration. Read the prompt, make sure you’re authorizing Shadowrocket, then complete any authentication required by your device.
If you previously denied authorization, return to Home and try connecting again. Watch for the system prompt. Device management or system restrictions may affect authorization; check the restrictions on your device rather than guessing at server passwords. If the connection switch immediately turns off, check for an authorization or configuration error before concluding that the server is unavailable.
Back on Home, check that the connection remains on and confirm the selected server and Global Routing mode. This only confirms that the local connection configuration was established; it doesn’t show how a particular page will be reached. A VPN indicator in the system status bar also doesn’t prove end-to-end access. Test the connection and visit a page in the next step.
The steps are the same on iPad: check the server entry, choose a routing mode, then turn on the connection. Layouts and system prompts may differ from the screenshots; follow what you see on your device. For the first test, keep the connection manual and leave On Demand for later. This makes it easier to distinguish automatic-connection issues from manual-connection issues.
STEP 04 / CONNECTIVITY TEST
Verify access: test and try a real request
With the connection on, tap Connectivity Test on Home and wait for it to finish. First check whether it gets a response, then interpret the result in light of Test Method in Settings. Different test methods check different parts of the connection, so a single result can’t confirm that every protocol, website, or app will work.
Next, open a browser and visit a page you know is available to check whether it loads. If the test gets a response but the page doesn’t load, first check how that page should be routed with the current Global Routing mode. Config may send it through DIRECT, or it may match PROXY or REJECT. Check the relevant request record and rule instead of immediately concluding that the selected server is unavailable.
Keep the test target the same when comparing results. Record the result with Config first, then temporarily switch to Proxy and revisit the same page. If the result changes only when you switch routing modes, check the rule order, final policy, and domain resolution settings in Config. After comparing, restore your planned routing mode so temporary diagnostic settings aren’t left in place.
Also distinguish between “traffic is present” and “the request took the expected route.” A change in traffic under Data only indicates corresponding activity in the statistics; by itself, it doesn’t prove a domain matched the intended policy. If the app provides a connection record for the request, check the domain, policy, and time together. Remove server addresses, subscription links, and authentication details before sharing diagnostic information.
STEP 05 / SETTINGS & DIAGNOSTICS
Common issues: check one layer at a time
If Shadowrocket won’t connect, first identify where it fails: the subscription didn’t import, the switch won’t stay on, the test fails, or only certain pages are inaccessible. Check the steps below in order, from your server details to the request itself. After each check, retry with the same target and note what changed. This is more useful for finding the cause than repeatedly deleting and re-adding everything.
No servers after import? Check the details and update status
Go back to the subscription entry and check that Type is set to Subscribe and the URL is complete. An expired link, unsupported content format, or network that can’t reach the subscription address can all prevent an update. Buying the app doesn’t automatically populate the server list; you need to import valid details you already have. If the original link has changed, confirm it with your service provider rather than piecing together an address from unverified sources.
Switch is on but the test fails? Check settings and test method
Open the relevant server details and compare each field with the original information, especially Type, Host, Port, authentication, and transport settings. In Settings, check Test Method and make sure you’re comparing the same kind of test. Different test methods can produce different results, but changing the method won’t fix incorrect server details or replace a real page-access check.
If needed, use Diagnostics in Settings to gather more information. Start by reviewing the output related to connection and resolution. Don’t share the entire diagnostic output publicly; it may contain network addresses or other private information. To compare Wi-Fi and cellular, keep the server, routing mode, and test target the same, and check whether the issue occurs on only one network.
Only some pages fail? Check rules and resolution
If most sites work but a few don’t, first check whether those requests match REJECT or are sent DIRECT when you expected otherwise. A broad rule placed earlier can prevent a more specific rule below it from taking effect. Confirm that FINAL is at the end of the rules and understand its policy. DNS resolution failures and proxy connection failures are different issues; use request records to tell them apart rather than changing every DNS setting at random.
Manual connection works but automatic connection doesn’t? Check On Demand last
After confirming a manual connection works, open Settings and check On Demand. Make sure the current network matches the trigger conditions, then see whether the connection switch changes as expected when the trigger fires. If you have several conditions, simplify to one that’s easy to test, then add the others one at a time. To isolate the issue, temporarily disable On Demand and repeat the manual connection and page-access tests.
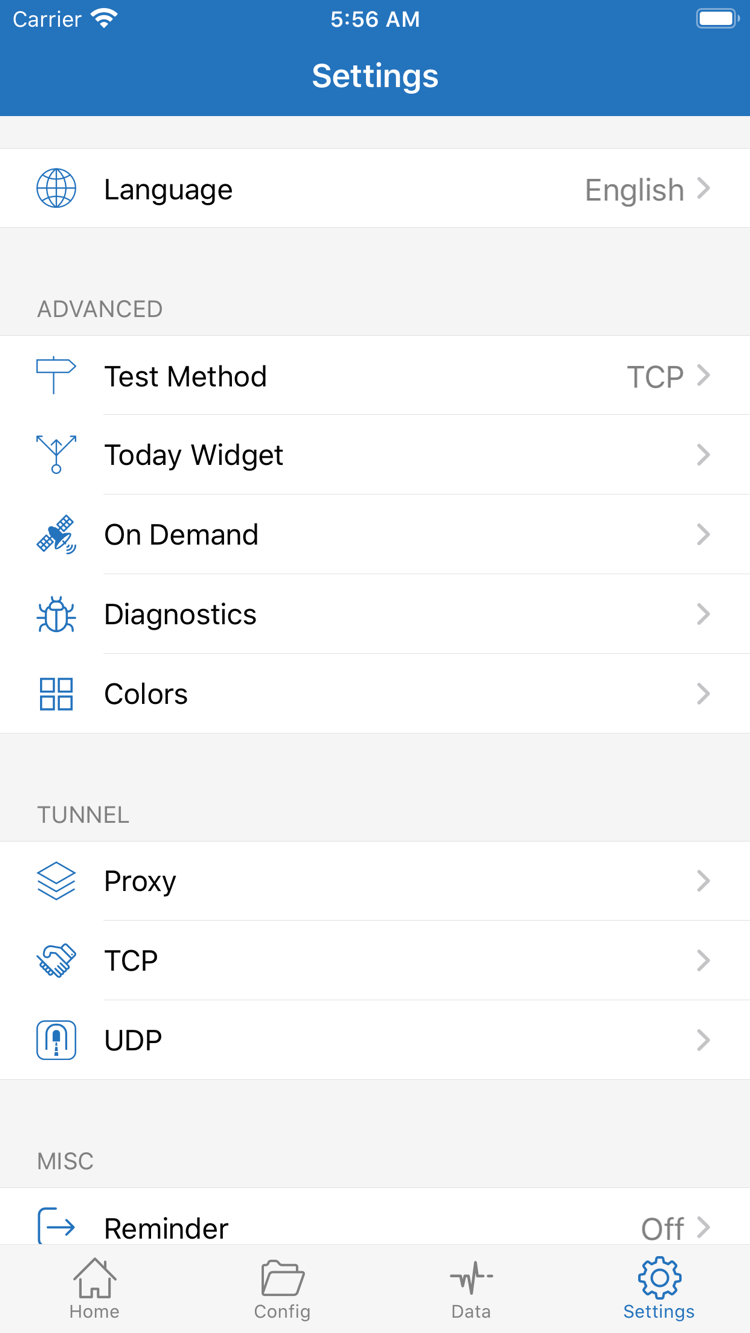
Settings also includes options related to Proxy, TCP, and UDP. For initial troubleshooting, avoid changing several of these at once. Check the relevant options only after you’ve identified the protocol requirements or scope of the failure. Working TCP access doesn’t guarantee that UDP apps will work, and one failed test doesn’t mean all traffic will fail. Describe what you observed specifically—for example, “The same server fails the test on cellular but responds on Wi-Fi”—instead of saying it “doesn’t work at all.”
By now, you should be able to narrow the issue down to server details, system authorization, the server connection, rules, or the network. For terminology, see the quick reference. For help checking your purchase account, storefront region, or restoring a purchase after reinstalling, see the purchase guide. Purchases and connectivity are separate troubleshooting paths; don’t buy the app again because a network request failed.